Pose Library Studio is now available. Access the full pose library and custom sessions.
Figure Drawing Proportions and Structure: The 8-Head Guide
A 7½-head figure is generally a more realistic representation of adult human proportions, although every person is different. When drawing from a live model or photograph, we should always observe and measure the proportions of the actual subject rather than relying on a predetermined formula.
However, having a general understanding of human proportions stored in our mental library is incredibly useful. For this purpose, the 8-head figure works particularly well because it can be divided easily into halves, quarters, and eighths. These simple divisions give us a reliable starting point when drawing from imagination and help us recognize when something looks or feels out of proportion.
The goal is to develop a generic figure that we can recall from memory. You can create your own proportional model or use the one provided below as a starting point. With practice, these approximate measurements become second nature, allowing you to spend less time guessing and more time focusing on the character or pose.
Understanding proportions also helps when placing characters in perspective. For example, knowing that the pubic symphysis falls approximately halfway down an 8-head figure allows us to locate the midpoint of the rectangle containing that figure. By dividing this rectangle into halves and quarters, we can establish useful landmarks and maintain consistent proportions as the figure moves through perspective.
The goal isn't to memorize a perfect human body. It's to build a reliable reference in your mind that you can adjust to fit the person you're drawing.
The 8-Head Figure
A simple proportion system for your mental library.
Artists often use the head as a convenient unit for measuring the figure. An 8-head figure is especially useful because it divides easily into halves, quarters, and eighths. Here, one head means the vertical distance from the chin to the top of the skull, not the width of the head.
A more naturalistic adult figure may be closer to 7½ heads tall, and real people vary considerably. Think of the 8-head figure as a generic starting point stored in your mental library. Once you understand these general relationships, differences in the model become easier to see.
The 8-Head Landmarks
Divide a standing figure into eight head-height units. The nine marks below include the top and bottom of the figure; each landmark is approximate.
| Head mark | Approximate landmark |
|---|---|
| 0 | Top of head |
| 1 | Chin |
| 2 | Nipple / upper chest area |
| 3 | Navel / waist area |
| 4 | Pubic symphysis — approximately halfway |
| 5 | Mid-thigh |
| 6 | Bottom of knee / upper shin area |
| 7 | Lower leg / roughly mid-shin |
| 8 | Bottom of heel |
The 4-head mark is a particularly useful check. In this simplified system, the pubic symphysis sits around halfway down the standing figure: roughly 4 heads of upper body + 4 heads of legs.
Useful Horizontal Measurements
- Shoulder width: roughly 2–2½ heads wide, with about 2¼ heads as a useful generic starting point.
- Clavicle: from the sternum to the shoulder/acromion, think roughly ½ head per side as a simple drawing shorthand. The deltoids extend the silhouette beyond these landmarks, adding to the full shoulder width.
- Pelvis/hips: roughly 1½–2 heads wide, depending heavily on the individual.
- Head width: roughly ⅔ of a head-height. Keep the difference between head width and head height in mind when comparing measurements.
Arms and Hands
When the arms hang naturally, use these approximate landmarks:
- The elbow falls around the waist/navel region.
- The wrist falls around the pubic symphysis.
- The fingertips reach approximately mid-thigh.
- The hand is roughly ¾ of a head long, measured from the wrist to the tip of the middle finger.
Legs and Feet
- Pubic symphysis to floor: approximately half the figure in the 8-head system.
- Knee: a little above the halfway point between the pubic symphysis and the ground. The knee region occupies roughly the 5½–6 head area in a simplified diagram.
- 7-head mark: roughly the mid-shin region. The final head-height includes the remaining lower leg and the height of the foot; it is not the ankle-to-heel distance.
- Foot: approximately one head long, though this varies from person to person. This is the heel-to-toe length, which may appear shorter in a front view.
Arm Span Is Approximately Height
For many adults, the distance from fingertip to fingertip with the arms extended is roughly comparable to standing height. In the generic 8-head system, think about 8 heads tall and about 8 heads fingertip to fingertip. This is a useful proportion check, with individual variation.
Helpful Anatomical Landmarks
These landmarks also help you check proportions and place the main forms of the body:
- Midpoint: the pubic symphysis is a useful starting point for finding halfway down a standing figure. Check its position against your model.
- Shoulders and hips: compare the shoulder width with the width of the ribcage and pelvic box. These relationships help you establish the overall silhouette.
- Elbows and wrists: when the arms hang naturally, the elbows fall roughly around the waist/navel region and the wrists near the pubic symphysis. Use the bottom of the ribcage as another nearby reference, and compare these positions with the model.
Proportions Are a Starting Point, Not a Formula
An 8-head figure gives you a simple generic model to keep in your mental library. A real person may be closer to 7½ heads tall, or have longer legs, a shorter torso, wider shoulders, narrower hips, or completely different relationships. Compare these landmarks with the model and adjust what you draw. In bent, seated, or foreshortened poses, the visible distances will change too.
Learn the generic figure so you can better recognize what makes your model unique.
How to Measure Proportions From a Photo
Begin with a full-body standing reference photographed near eye level, with the head, feet, and major joints visible. A relatively upright pose is easier to compare with the 8-head guide than a crouching pose or a view with strong foreshortening.
- Find one head-height. Measure from the chin to the top of the skull, allowing for hair that extends beyond it. Use that distance as a unit within the same photo.
- Compare the full height. Check how many of those units fit from the top of the skull to the soles. Use the result you observe rather than stretching the model to eight heads.
- Locate the main landmarks. Compare the pubic symphysis with the halfway point, then check the waist, knees, elbows, and wrists. Observe where they actually fall.
- Compare widths. Check shoulder and hip width against the same head-height unit, keeping any turn of the torso or pelvis in mind.
- Adjust your construction. Place the ribcage, pelvis, and limbs to match these relationships before adding smaller details.
Compare Landmarks With Alignment Lines
Imagine a vertical line dropping from a clear landmark, such as the pit of the neck or one of the front points of the pelvis (the anterior superior iliac spines, or ASIS). See where the other parts of the figure sit in relation to that line. Does the knee fall directly below it, or to one side?
Use horizontal lines to compare heights too: is the wrist higher or lower than the pubic symphysis? These simple checks help you place the forms in leaning, bent, or angled poses, where the standing head-count guide is harder to apply. Keep the lines vertical or horizontal on the page, and compare what you see in the reference.
A Worked Proportion Check
Suppose a clear standing reference measures about 7½ heads tall, with shoulders about 2 heads wide and a pubic symphysis slightly below the figure's halfway point. These are example observations, not measurements every model will share.
- Height: keep your drawing at 7½ head units rather than adding half a head to make it fit the generic guide.
- Shoulders: use the observed 2-head width instead of the generic 2¼-head starting point.
- Torso and legs: place the pubic symphysis below halfway to preserve the model's relatively longer upper body and shorter legs.
The guide helps you notice the differences; the reference determines your drawing. For more on this approach, see how to study pose references without copying.
What Do We Mean by Structure?
Structure is how the body is built.
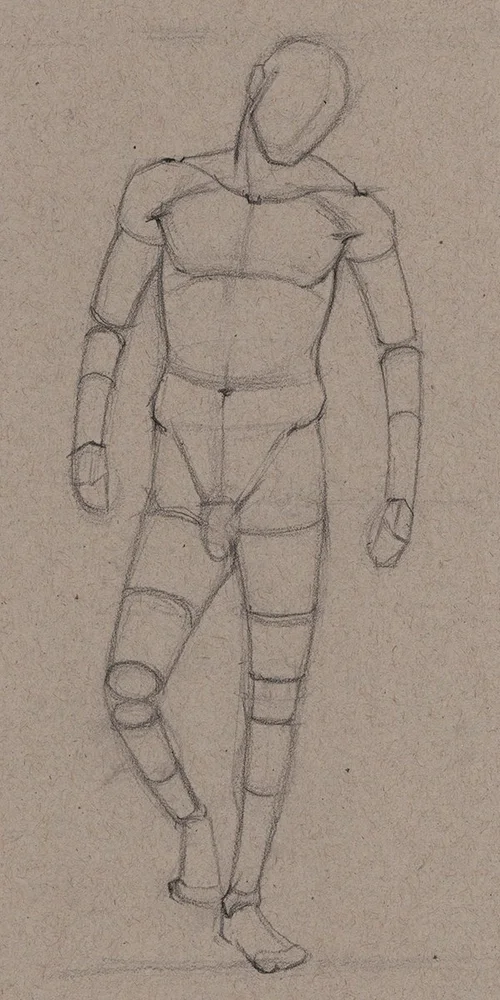
Instead of thinking in outlines, think in basic forms:
- ribcage as an egg or box
- pelvis as a box
- head as a simple sphere
- arms and legs as cylinders
These forms help you understand:
- how the torso tilts
- where weight is placed
- how limbs attach
- how the body balances itself
You are not drawing muscles yet. You are building the framework.
If you practice from photos, this companion guide shows how to study reference without tracing.
Start With Gesture First
Always begin with the line of action. This gives you the main flow of the pose.
Once you have that, lightly place:
- ribcage
- axis lines
- pelvis
- head
- limbs
Keep everything loose. Think of these shapes as placeholders. They exist only to help you understand the pose. If the torso is the hard part, spend extra time with constructing the torso in gesture drawing.
Build the Figure With Basic Shapes
After placing the torso and head:
- indicate shoulders and hips
- add arms and legs with simple lines or cylinders
- mark hands and feet with small shapes
At this stage, your drawing should look like a loose mannequin. That is perfect.
You are learning how the body fits together. For clearer shoulder and pelvis placement, use shoulder and hip axis lines to check tilt and balance.
A Simple 12-Pose Structure Routine
If you want a practical way to study figure drawing proportions and structure, use this sequence:
- 5 poses at 1 minute: line of action, ribcage, pelvis, and head
- 5 poses at 2 minutes: add shoulder and hip angles, limb directions, and basic proportions
- 2 poses at 5 minutes: refine the torso, leg length, balance, and simple forms
The goal is not a finished drawing. The goal is to repeat the same structure checks until they become easier to see.
Timed Poses Help You Learn Faster
Timed drawing removes overthinking.
Short poses force you to focus on:
- big shapes
- overall balance
- proportion relationships
Try this simple routine:
- 5 poses at 1 minute
- 5 poses at 2 minutes
- 2 poses at 5 minutes
The shorter poses train speed and observation. The longer poses let you refine structure. Consistency matters more than perfection. If you need a lighter entry point, start with a figure drawing warm-up before this routine.
Frequently Asked Questions
Is a figure 7½ or 8 heads tall?
Both are useful drawing guides. A naturalistic adult figure may be closer to 7½ heads tall, while an 8-head figure is a convenient idealized system that divides easily into halves and quarters. Real people vary, so measure your model rather than assuming either count is exact.
Where is the halfway point of the body?
In the simplified 8-head system, the pubic symphysis sits at the 4-head mark, approximately halfway between the top of the skull and the soles. Your model's halfway point may differ with their proportions and pose.
How do you measure figure drawing proportions from a photo?
Use the chin-to-top-of-skull distance as one head-height, then compare the figure's visible height, shoulder width, hip width, and major landmarks against that unit. Start with a clear, upright full-body photo and adjust the drawing to the measurements you observe.
How do proportions change with foreshortening?
Foreshortening changes the visible lengths of body parts as they turn toward or away from you. The body's physical proportions stay the same, but a thigh or forearm may look much shorter in the image. Compare visible shapes, overlaps, and joint positions instead of applying the standing 8-head divisions directly to a bent or foreshortened pose.
How do beginners practice figure drawing proportions?
Beginners should practice figure drawing proportions by comparing large relationships first, such as the head to torso, ribcage to pelvis, and legs to torso. Avoid detailed measuring at first and focus on simple forms.
What does structure mean in figure drawing?
Structure in figure drawing means simplifying the body into basic forms, such as the ribcage, pelvis, head, and limb cylinders, so the figure feels solid and balanced.
Should gesture drawing come before structure?
Yes. Starting with gesture keeps the pose alive. Structure should be added after the line of action so the figure has both movement and stability.
How long should structure practice poses be?
For structure practice, 1-minute poses help you place major forms quickly, 2-minute poses give time for proportion checks, and 5-minute poses let you refine the figure without getting lost in detail. For more timing options, read How Long Should Gesture Poses Be?.
Final Thoughts
Figure drawing is not about copying photos. It is about understanding how the body moves and balances in space.
Gesture gives you motion. Structure gives you form. Proportion ties everything together.
Keep showing up. Each session builds your visual library.