The CSI Method: C Curves, S Curves, and Straight Lines
A simple method for analyzing poses using C curves, S curves, and straight lines to improve gesture drawing.
Introduction
The CSI method in drawing is a simple way to construct figure drawings using three types of lines: C curves, S curves, and straight lines. Artists use this method to simplify complex poses, find the gesture of the figure, and avoid stiff drawings.
Instead of thinking about anatomy first, the CSI method helps you focus on movement. By identifying whether a part of the pose follows a C curve, S curve, or straight line, you can quickly capture the flow of the figure before adding structure and details.
One of the hardest parts of figure drawing isn't the anatomy. It's figuring out what you're actually looking at.
When people first start drawing the human figure, the body looks like chaos. Arms twist, the torso rotates, the legs bend in different directions. It feels like there's too much information all at once.
I remember staring at poses during gesture drawing sessions and feeling completely stuck. I'd try to copy every shape I saw. The rib cage, the pelvis, the muscles, all of it. The drawing would quickly turn into a mess of lines.
Nothing connected.
Eventually someone showed me a simple trick artists use to simplify complex poses. It's called the CSI method.
CSI stands for three line types:
- C curves
- S curves
- Straight lines
That's it.
These three shapes appear everywhere in the human figure. Once you start noticing them, figure drawing gets a lot easier. Instead of copying anatomy piece by piece, you begin describing movement using simple directional lines.
At first this method was something I had to consciously think about. I'd look at the pose and literally ask myself, "Is this a C curve, an S curve, or a straight?"
After enough practice though, something interesting happened. It became automatic. I stopped thinking about it.
Now when I look at a pose, the curves and straights are just... there.
The CSI method is especially useful when a pose feels confusing. When the body twists or overlaps in ways that are hard to read, breaking the figure into C curves, S curves, and straight lines gives you a simple starting point.
And once that first structure is clear, the rest of the drawing gets much easier.
Short timed poses to focus on line and flow
Practice the CSI method
Draw using only C curves, S curves, and straight lines
No signup required. Just press play and draw.
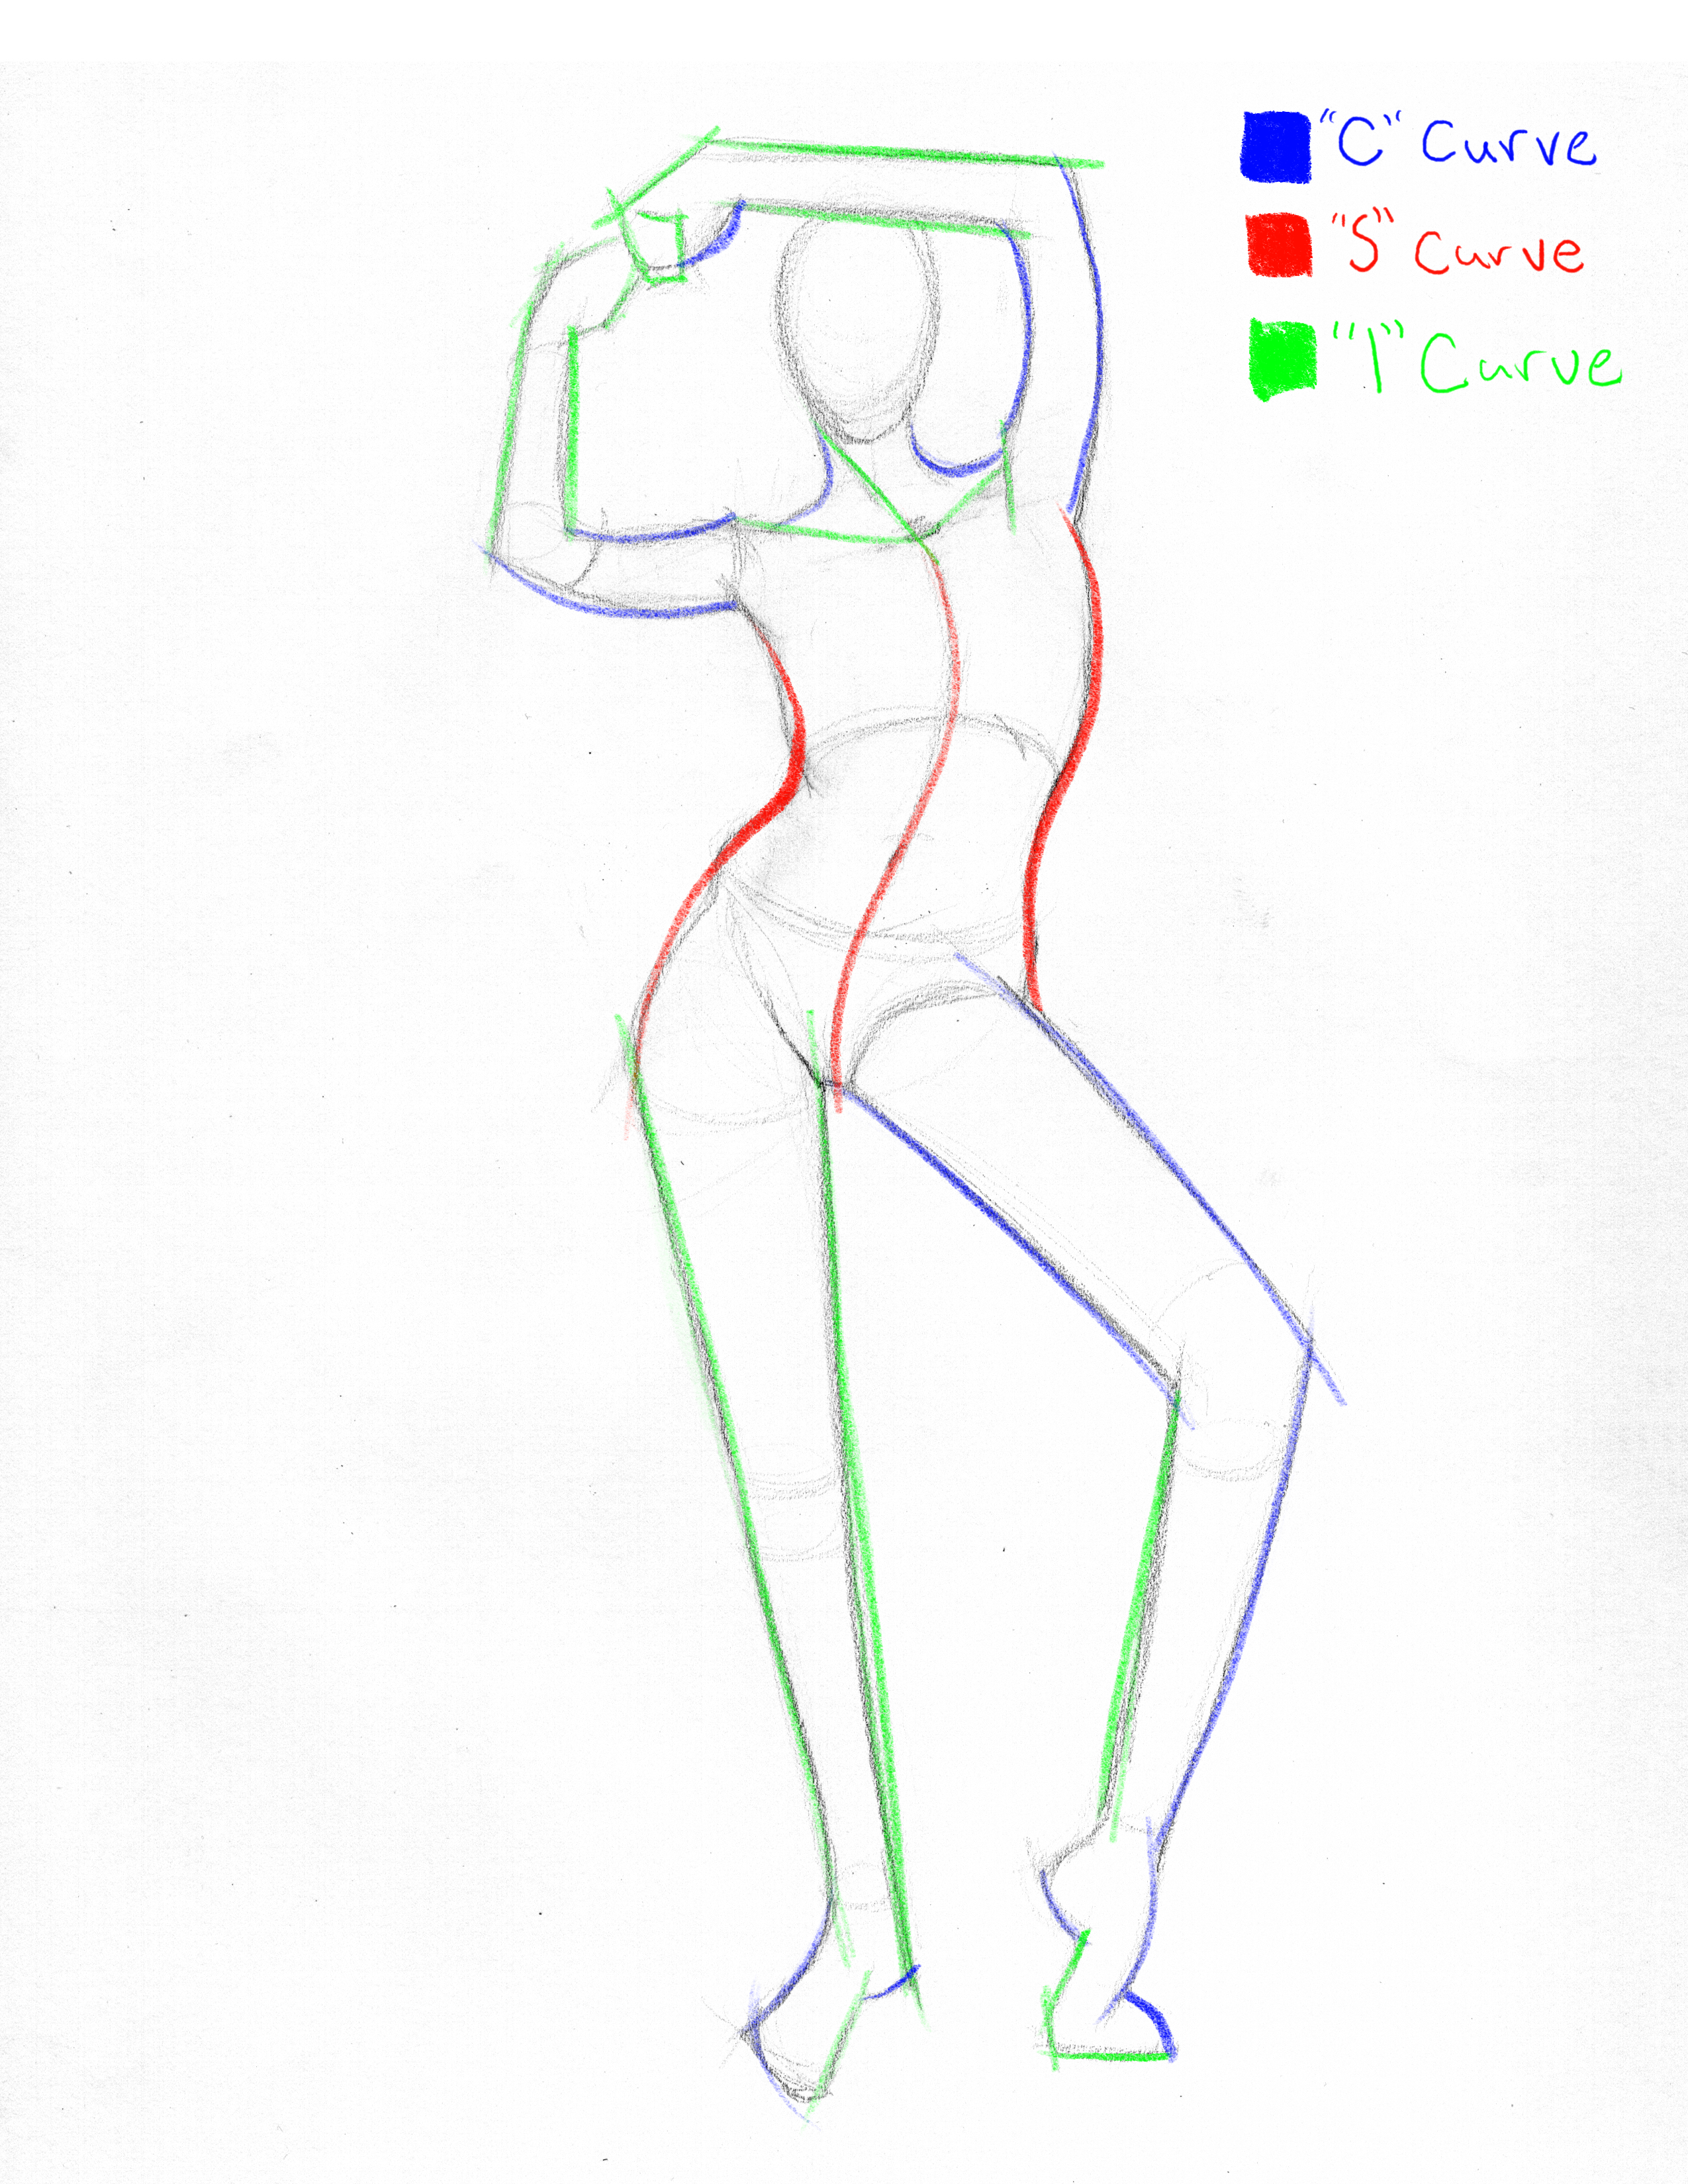
What Is the CSI Method in Drawing?
The CSI method in drawing is a way to simplify the human figure by identifying three basic line types.
Artists use:
- C curves
- S curves
- Straight lines
These shapes describe the direction and rhythm of the body.
Instead of drawing muscles right away, the artist looks for the dominant flow of the pose.
Here's what each line type represents:
C Curves
- A single directional bend
- Often appears in the torso or limbs
- Helps describe simple movement
S Curves
- A flowing change of direction
- Common in the spine or contrapposto poses
- Creates rhythm and balance
Straight Lines
- Structural support
- Often appears in legs or weight-bearing limbs
- Adds stability to the drawing
This approach works extremely well with gesture drawing. Gesture drawing focuses on movement and rhythm, not details.
The CSI method gives artists a simple system for analyzing poses quickly. Instead of guessing what's happening, you break the figure into a few clear directional lines.
How to Use the CSI Method in Gesture Drawing
The CSI method works best when used as the first pass of a drawing. Instead of starting with anatomy or details, you begin by identifying the overall movement of the pose using simple line types.
Step 1 - Start with the largest movement of the pose
Look for the biggest directional flow of the body. This is often similar to the line of action.
Step 2 - Decide whether the movement is a C curve, S curve, or straight line
Most poses naturally fall into one of these three categories.
Step 3 - Add secondary curves
Use additional C and S curves to describe the torso, arms, legs, and hips.
Step 4 - Use straight lines for stability
Straight lines often appear in weight-bearing areas such as the standing leg or compressed torso.
Step 5 - Keep the first pass simple
Focus only on the flow of the pose before adding anatomy or structure.
Once the gesture is established, you can build the figure using simple shapes and anatomy on top of these guiding lines.
Understanding C Curves in Figure Drawing
A C curve is one of the most common shapes in figure drawing.
It's simply a curve that bends in one direction. Like the letter C.
You'll see these everywhere in the human body.
Common places C curves appear:
- The rib cage when someone leans sideways
- The outer contour of an arm
- The curve of the thigh
- The bend of the back
When I first started practicing gesture drawing, I didn't notice these shapes at all. I was too focused on outlines.
But once someone pointed it out, I started seeing C curves everywhere.
One helpful trick is to follow the longest direction of a form. The torso often forms a big sweeping C curve when someone bends.
Another tip is to ignore small anatomy details and look for the overall direction of movement.
Ask yourself:
- Is the body leaning left or right?
- Is the torso bending forward?
- Is the arm forming a curved arc?
That big directional bend is usually your C curve.
C Curve Examples in Figure Drawing
C curves describe a single directional arc through the body. They are common in relaxed poses where the torso bends in one direction.
Artists often see C curves in poses where the figure leans forward, stretches, or compresses the torso. The curve usually runs through the spine or along one side of the body.
C curves are often found in:
- leaning poses
- seated figures
- bending torsos
- reaching gestures
- relaxed contrapposto stances
When practicing gesture drawing, try identifying the main C curve before adding any structure or anatomy.
Understanding S Curves in Gesture Drawing
If C curves describe simple movement, S curves describe rhythm.
An S curve changes direction once. It flows from one curve into another.
These appear frequently in dynamic poses.
You'll often see S curves in:
- The spine during contrapposto poses
- A standing figure shifting weight to one hip
- The relationship between rib cage and pelvis
The human body naturally creates these shapes when balancing weight.
For example, when a person shifts their weight onto one leg, the pelvis tilts. The torso then compensates in the opposite direction.
This creates a natural S curve through the body.
Artists love S curves because they create flow. The eye moves along the shape smoothly.
When gesture drawings feel stiff, it's often because the artist ignored the natural S curves of the pose.
S Curve Examples in Gesture Drawing
S curves describe a flowing movement where the direction changes once through the body. These curves often appear in contrapposto poses where the hips and shoulders tilt in opposite directions.
The S curve is one of the most common gesture lines in figure drawing because it naturally expresses movement and balance.
You will often see S curves in:
- walking poses
- twisting torsos
- contrapposto standing poses
- dancing figures
- athletic movement
Many classical sculptures use S curves to create elegant and dynamic poses.
Using Straight Lines in Figure Drawing
A lot of beginners think figure drawing should be all curves.
But straight lines are just as important.
Straight lines add structure and contrast.
Common places straight lines appear:
- The supporting leg in a standing pose
- The forearm when the arm is extended
- The back edge of the rib cage
Straight lines often appear in parts of the body that are supporting weight.
When combined with curves, they create a nice visual balance.
Think of it this way.
Curves show movement.
Straights show stability.
When both appear together, the pose feels believable.
Straight Line Examples in Figure Drawing
Straight lines represent stability and compression. They are commonly found in areas of the body that support weight or resist gravity.
For example, a standing leg might be drawn with a straight line to emphasize strength and structure, while the opposite side of the body uses a curve to show movement.
Straight lines are often useful for:
- weight-bearing legs
- compressed sides of the torso
- strong arm extensions
- rigid structural poses
Using straights together with curves creates contrast and makes gestures feel more dynamic.
How the CSI Method Helps Simplify Complex Poses
Sometimes you'll see a pose and think, "What is even happening here?"
Maybe the body is twisting. The arms overlap the torso. The legs cross.
This is where the CSI method becomes really useful.
Instead of analyzing everything at once, you ask a simple question.
What line types do I see?
Start by identifying the biggest movement in the pose.
Then look for:
- One dominant curve
- One counter curve
- Any straight structural lines
Suddenly the pose becomes easier to understand.
Instead of chaos, you now see a structure of curves and straights guiding the body.
This makes gesture drawing faster and more accurate.
CSI Method and Line of Action
The CSI method works closely with another concept in figure drawing.
The line of action.
The line of action captures the primary movement of the pose.
In many cases that line will follow:
- A large C curve
- Or a large S curve
The CSI method helps you understand movement.
It reveals the underlying structure of the movement.
When both ideas are used together, gesture drawings become much clearer and more expressive.
Common CSI Method Mistakes
Like any drawing method, the CSI approach can become stiff if used incorrectly. Here are some common mistakes beginners make when learning this technique.
Using Only Curves
Not every part of the body should be curved. Straight lines help create contrast and structure.
Overcomplicating the First Pass
The CSI method is meant to simplify the pose. Focus only on the main movement first.
Ignoring the Line of Action
The CSI lines should support the overall gesture of the pose, not replace it. If this keeps happening, review these common line of action mistakes.
Drawing Identical Curves Every Time
Beginners sometimes default to the same S curve for every pose. Varying curve strength makes drawings feel more natural.
CSI Method Practice Exercise
A simple way to practice the CSI method is to draw quick gesture sketches using only C curves, S curves, and straight lines.
Try setting a timer and drawing poses in short intervals such as 30 seconds or 1 minute. Focus only on identifying which type of line best represents the movement of each part of the body.
A simple exercise looks like this:
- 1-minute gesture drawings
- Only use three line types
- Ignore anatomy
- Focus only on flow
This exercise trains your eye to see the underlying structure of a pose before adding details. Timed pose practice works especially well because it forces you to simplify the figure quickly.
CSI Method Drawing FAQ
What does CSI mean in drawing?
CSI stands for C curves, S curves, and straight lines. These three line types are used to simplify the movement and structure of the human figure.
Is the CSI method good for beginners?
Yes. The CSI method helps beginners simplify complex poses by focusing on the flow of the body rather than detailed anatomy.
What is the difference between C curves and S curves?
A C curve bends in a single direction, while an S curve changes direction once through the body, creating a flowing motion.
When should you use straight lines in figure drawing?
Straight lines are often used in weight-bearing areas such as standing legs or compressed parts of the torso.
How does the CSI method relate to line of action?
The line of action captures the overall movement of the pose. The CSI method helps break that movement into smaller directional curves and straight lines throughout the body.
Conclusion
Learning to see C curves, S curves, and straight lines can completely change the way you approach figure drawing.
The CSI method gives artists a simple way to simplify complicated poses. Instead of worrying about muscles and anatomy right away, you focus on movement, rhythm, and structure.
At first this method may feel like something you have to consciously think about.
You'll look at a pose and ask yourself which line types are present.
But after enough practice, something interesting happens. The process becomes automatic.
You begin seeing these shapes instantly.
And once that happens, gesture drawing becomes faster, clearer, and a lot more enjoyable.