Pose Library Studio is now available. Access the full pose library and custom sessions.
How to Find the Line of Action in Standing Poses
Learn how to identify the dominant flow, movement, and rhythm in standing poses so your gesture drawings feel more dynamic and alive.
Standing poses seem simple at first glance. After all, the model is just standing there. How hard can it be?
That was exactly what I used to think when I first started gesture drawing. I would sit down in a life drawing session, see a standing model, and assume the drawing would be easy. Then twenty minutes later I'd be staring at a stiff sketch that looked more like a mannequin than a living person.
The problem usually is not anatomy. It is not proportions either. The problem is that many beginners are not looking for the line of action.
Most people approach standing poses by drawing outlines. They start at the head, work their way around the shoulders, trace the torso, and eventually reach the feet. The drawing might be accurate, but it often feels lifeless because the overall movement of the pose was never captured.
The line of action is what gives a figure energy. It is the dominant flow that runs through the pose. Think of it as the visual path your eye follows when looking at the figure. Before muscles, before anatomy, before details, there is movement.
Even a person standing completely still has movement. A slight shift of the hips can create a beautiful curve through the body. A raised shoulder can pull the entire pose upward. A relaxed stance can create a subtle rhythm that makes the figure feel natural and believable.
That is why learning to find the line of action in standing poses matters so much. Standing poses appear simple, but they often contain subtle shifts in balance, weight distribution, and body mechanics that can be difficult to recognize at first.
Practice standing poses with short timers
Focus on movement before anatomy or contour
5 x 30-second poses
No signup required.
What Is the Line of Action?
The line of action is the dominant flow or movement of a pose.
When artists talk about gesture drawing, they are often talking about the process of identifying and drawing this flow before anything else. The line of action helps simplify a complex figure into a single directional statement.
I like to think of it as the answer to one simple question: What is this pose doing?
A figure may be reaching upward, leaning forward, twisting, relaxing, pushing, or pulling. The line of action captures that idea.
One mistake many artists make is believing the line of action is always the spine. Sometimes it follows the spine closely, but not always. In many standing poses the line may begin at a raised arm, travel through the torso, and end at the supporting foot. In another pose it may start at the head and flow into the leg carrying most of the body's weight.
The goal is not to locate one specific anatomical structure. The goal is to identify the strongest visual movement in the pose.
Why Standing Poses Fool Beginners
Standing poses feel easier because the model is upright and familiar. But familiarity can be misleading. Artists often assume there is not much happening, so they stop searching for movement too early.
The gesture in a standing pose is often subtle. The body may only tilt a little. The hips may shift a few inches. The shoulders may counter that shift almost invisibly. Those small relationships are exactly what make the pose feel alive.
If you skip that first read, your drawing usually becomes a collection of separate parts. Head, torso, pelvis, legs. Everything may be in roughly the right place, but the figure still feels stiff. If that sounds familiar, compare your habits against these common line of action mistakes.
Standing poses also introduce a clear question of balance. Which leg is carrying the weight? Which side of the pelvis drops? Does the torso lean over the support leg or away from it? Those balance cues usually reveal the line of action much faster than tracing the outside contour.
How to Find the Line of Action in Standing Poses
Start by ignoring details and looking for the longest flow through the body. Squint if you need to. Forget the fingers, facial features, and clothing folds. Ask yourself what direction the pose is moving.
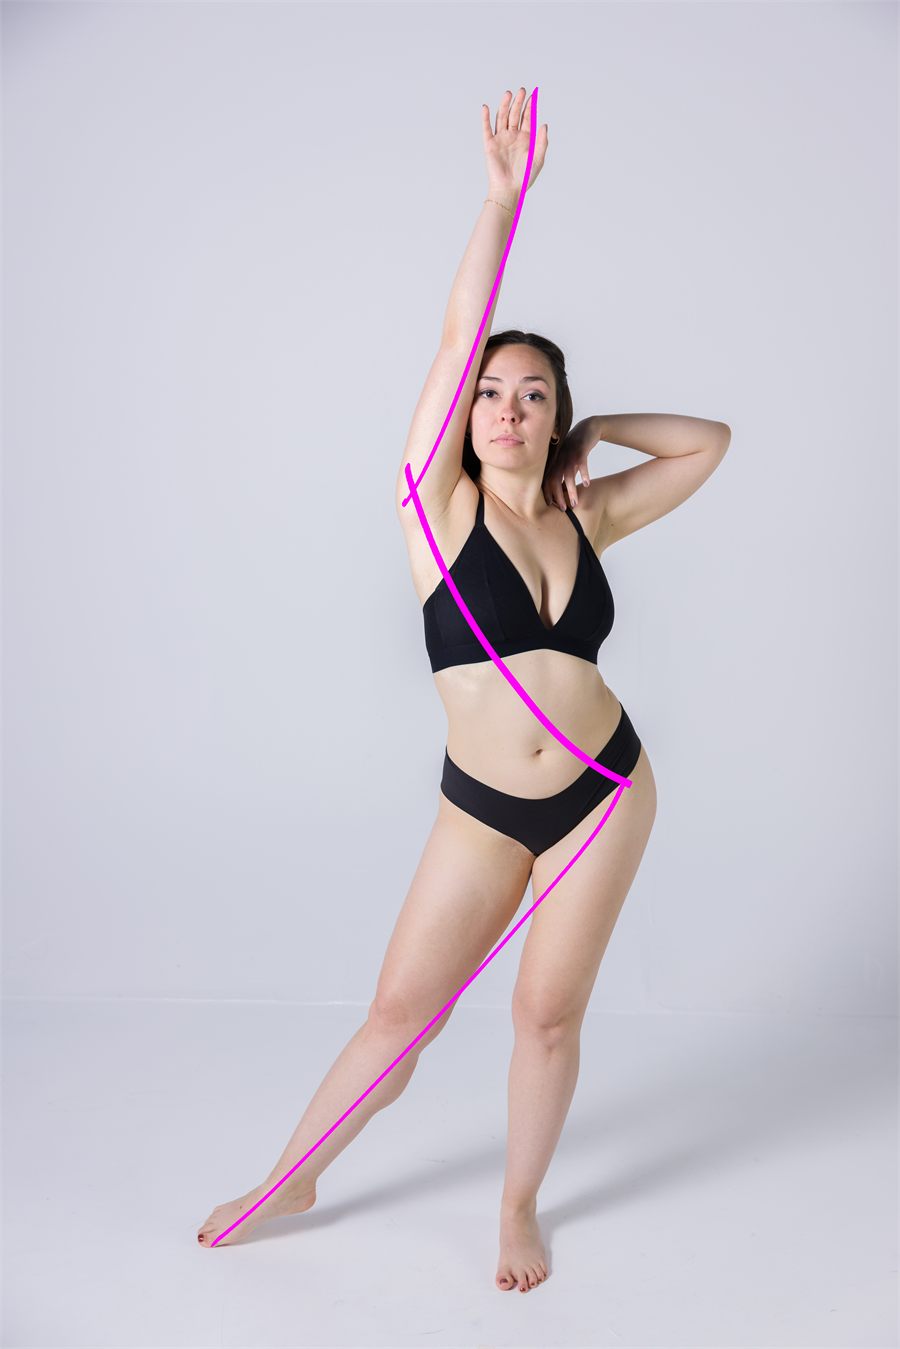
In standing poses, I usually look for the relationship between the head, rib cage, pelvis, and supporting leg. The line of action often runs through those four ideas even if it does not literally pass through every contour on the page.
One of the fastest ways to read the pose is to identify the weight-bearing leg first. Once you know where the body is supported, the rest of the gesture often becomes much clearer. The torso may arc over that leg in a C-curve, or it may twist against it in a more complex S-curve.
I also look for the longest uninterrupted movement. Sometimes that line starts at the top of the head and drops to the grounded foot. Sometimes it begins in an arm or shoulder and sweeps down through the torso. The exact path can change from pose to pose. What matters is that it captures the strongest visual idea first.
Speed matters here. The first action line should happen within the first few seconds. If you wait too long, you start analyzing instead of seeing. If you want to train that first read, use this guide on how to see the line of action quickly.
How to Recognize C-Curves and S-Curves in Standing Poses
Once you start practicing a lot of standing poses, patterns repeat. The two most common are the C-curve and the S-curve.
C-curve standing poses usually happen when the body leans in one dominant direction. The torso bends as one broad arc, often with the hips shifting to one side and the shoulders responding with a softer counter-tilt. These poses often feel calm, graceful, or relaxed.
S-curve standing poses appear when the body has a stronger sense of opposition. The hips may move one way while the shoulders rotate or tilt the other way. This creates a more serpentine rhythm through the figure. Many natural contrapposto poses have some version of this pattern.
You will also see straighter action lines in more upright or tense poses. Straight does not mean lifeless. It just means the dominant statement is more vertical or compressed than curved. The same basic simplification is what makes the CSI method so useful for gesture drawing.
The main point is not to force every pose into a formula. The point is to notice whether the body behaves more like a C, an S, or a straighter rhythm. Once you can label that quickly, your first gesture line gets much easier to place.
Common Mistakes in Standing Pose Gesture Drawing
The most common mistake is outlining the pose before drawing the gesture. The silhouette may be accurate, but it rarely captures the energy of the figure by itself.
Another mistake is treating the line of action as a spine-tracing exercise. The spine can help, but the real goal is to capture the strongest movement in the whole pose. In a standing figure, that movement may travel through the torso and support leg more clearly than through the spine alone.
A third mistake is underestimating balance. If you do not know which leg carries the weight, your line of action often becomes vague. The drawing may look upright but not believable.
Finally, many artists draw the line too cautiously. Gesture needs commitment. A slightly exaggerated action line usually gives you a more useful foundation than a timid one. If your standing figures keep looking rigid, the problem may be broader than this one pose family. In that case, read why gesture drawings look stiff.
A Simple 30-Second Standing Pose Drill
A good practice exercise is to draw five standing poses at 30 seconds each and limit yourself to just the line of action plus one extra clue about balance, such as the tilt of the shoulders or the direction of the support leg.
That restriction keeps your attention on movement. It also stops you from drifting into anatomy too early. Sometimes a single curved line captures more life than a fully rendered figure drawing.
During each pose, ask:
- Where is the weight?
- Is the main rhythm closer to a C-curve, an S-curve, or a straight?
- What is the longest visual flow through the body?
By the end, you will start seeing gesture in poses that once looked completely static.
Standing poses only seem simple. Once you learn to look for balance, flow, and rhythm first, they become one of the best ways to train your eye for subtle gesture.